
Tuesday, 29 May 2012
The front of the shop is born
Keep on keeping on
I haven't stopped work on Bentley's, though I confess to having spent some time answering the call of the sunshine and the garden, so I haven't given the shop as much time as usual; also it wasn't worth blogging as there aren't a lot of changes taking place. I am just doing more and more of the same. Painting all the trims (two coats plus sanding between the coats) takes a heck of a long time and it certainly isn't worth recording in any way.
I have different mixes of skirting, coving, picture rail and dado rail for each room. I am getting much better at cutting mitres on funny shaped pieces of wood, although picture rails seem to be beating me. Believe me you will need a small mitre box and good sharp, fine-toothed saw. Neither are very expensive and the difference between what you can manage with them and doing it without a box and using a junior hacksaw is beyond belief. Pleased with how they were turning out I decided to sidestep my order of build schedule as I couldn't wait to see some of them in place. Catastrophe!
 I completely forgot that the roof wasn't glued down and blithely added the coving in the top floor stair-well, thereby anchoring the centre of the roof to middle walls. After a bit of a struggle I finally managed to lift the side edges of the roof a little and squeeze in some glue. Here's hoping that when the mansard roof is hinged on and it gets opened and closed to look at the top floor it doesn't flex the (very minimal) roof joints too much!
In the same vein, I finished two coats of satin and two sandings on a piece of flooring and was so pleased with the result I stuck it in place and stepped back to admire it. Clunk, I then remembered I meant to cut a groove in the floor first for the wire for the (future) fireplace.
 After this I decided the best way every time I though of something 'not-to-do-because' was to write a note on masking tape and stick it in the appropriate place and stop relying on my terrible memory.
So, I am still unable to complete a whole task. With the exception of the kitchen, the trims in the rooms are only partly done because they all depend on something else before they can be completed, such as fires, cupboards, shelves etc.
 Frustrated by all this, today I decided I'd go off at a tangent and tackle the dormer windows. This picture shows them all ready for the bricks. Decorating them turned out to be incredibly fiddly.
The flat roofs are just grey paint as I can't afford the lead to cover them just yet. The ceilings needed three coats of paint before they stopped looking patchy. The outside walls were painted with the mortar coloured paint and some scruffy splodges added to show between the bricks so it wouldn't be all one clean colour. The inner walls needed to match where they will be going - one is papered and two are painted. Then the inner window frame needed painting (two coats) in the silk creamy white to match the other woodwork.
 I am using Richard Stacey versi-bricks which I have seen on a couple of houses at shows and they look wonderful. They don't look quite as wonderful done by me.
The dormers were probably the wrong things to choose for starting my bricklaying career. They turned out to be incredibly complex.
I'm afraid I don't have any great tips to help anyone who is considering using these versi-bricks other than, if you can, choose the easiest, flattest, most hidden area for your first go at them.
 You are working with a 1/16th inch (or 1mm) tolerance on all your cuts. Quite a few of the bricks were trimmed as often as four times to get the fit precisely right. I needed to turn them round the window frame very accurately; if they were too long they would stop the window frame going in properly. If they were cut too short all the gaps would be on show.They proved impossible to trim once they were in place so I just had to cut precisely.
All the cuts and the scoring needed for folding have to be a perfect ninety degrees to the perpendicular or the brick ends up on a slope making the next and subsequent bricks equally lopsided.
Spacing is incredibly difficult. I used the ruler edge as a way of checking the gaps between each brick. I do recommend you find something to check each gap as doing it by eye is not as easy as you think. I also needed to get from the top to the bottom of the wall starting and finishing with a whole brick and the bricks need to be on a line with the bottom and top of the window opening. As you can see from the photograph I tried measuring and ruling lines for each brick but, for some reason, that didn't work; they were never on the marks.
 I pretty soon realised I didn't like the brightness of the grout colour I had chosen. I had spent ages comparing paint charts to the grout in our house walls and ended up spending four pounds for a sample pot of Farrow and Ball paint as it was the only make I could find with exactly the right colour.
Probably the problem is that our house is only about five years old and what looks right on a house now doesn't look right for the brickwork on a Victorian Shop .
Here are the before and after fronts of the shop. One is in the nice clean cream mortar colour and the other looks pretty dirty. I made up a grey/green wash and almost dry brushed it onto the creamy paint. That was OK but then having to fill in the 1 mm gaps between the bricks which were already in place was not so much fun.
 Something like 150 bricks later and this was the end result. I am hoping that I was just too close up and personal and that it will look fine when it is in place on the building. We'll see.
It seems virtually impossible but this actually took the best part of a day! I started around 11 am and finished around 6.30 pm. It didn't have all my attention as laundry and cooking and eating lunch and other minor chores had to be done too, but it certainly took all my free time today. Only about 1,300 more to do and then..... the roof slates!
I have different mixes of skirting, coving, picture rail and dado rail for each room. I am getting much better at cutting mitres on funny shaped pieces of wood, although picture rails seem to be beating me. Believe me you will need a small mitre box and good sharp, fine-toothed saw. Neither are very expensive and the difference between what you can manage with them and doing it without a box and using a junior hacksaw is beyond belief. Pleased with how they were turning out I decided to sidestep my order of build schedule as I couldn't wait to see some of them in place. Catastrophe!

In the same vein, I finished two coats of satin and two sandings on a piece of flooring and was so pleased with the result I stuck it in place and stepped back to admire it. Clunk, I then remembered I meant to cut a groove in the floor first for the wire for the (future) fireplace.

So, I am still unable to complete a whole task. With the exception of the kitchen, the trims in the rooms are only partly done because they all depend on something else before they can be completed, such as fires, cupboards, shelves etc.

The flat roofs are just grey paint as I can't afford the lead to cover them just yet. The ceilings needed three coats of paint before they stopped looking patchy. The outside walls were painted with the mortar coloured paint and some scruffy splodges added to show between the bricks so it wouldn't be all one clean colour. The inner walls needed to match where they will be going - one is papered and two are painted. Then the inner window frame needed painting (two coats) in the silk creamy white to match the other woodwork.

The dormers were probably the wrong things to choose for starting my bricklaying career. They turned out to be incredibly complex.
I'm afraid I don't have any great tips to help anyone who is considering using these versi-bricks other than, if you can, choose the easiest, flattest, most hidden area for your first go at them.
 You are working with a 1/16th inch (or 1mm) tolerance on all your cuts. Quite a few of the bricks were trimmed as often as four times to get the fit precisely right. I needed to turn them round the window frame very accurately; if they were too long they would stop the window frame going in properly. If they were cut too short all the gaps would be on show.They proved impossible to trim once they were in place so I just had to cut precisely.
 All the cuts and the scoring needed for folding have to be a perfect ninety degrees to the perpendicular or the brick ends up on a slope making the next and subsequent bricks equally lopsided.
Spacing is incredibly difficult. I used the ruler edge as a way of checking the gaps between each brick. I do recommend you find something to check each gap as doing it by eye is not as easy as you think. I also needed to get from the top to the bottom of the wall starting and finishing with a whole brick and the bricks need to be on a line with the bottom and top of the window opening. As you can see from the photograph I tried measuring and ruling lines for each brick but, for some reason, that didn't work; they were never on the marks.

Probably the problem is that our house is only about five years old and what looks right on a house now doesn't look right for the brickwork on a Victorian Shop .
Here are the before and after fronts of the shop. One is in the nice clean cream mortar colour and the other looks pretty dirty. I made up a grey/green wash and almost dry brushed it onto the creamy paint. That was OK but then having to fill in the 1 mm gaps between the bricks which were already in place was not so much fun.

It seems virtually impossible but this actually took the best part of a day! I started around 11 am and finished around 6.30 pm. It didn't have all my attention as laundry and cooking and eating lunch and other minor chores had to be done too, but it certainly took all my free time today. Only about 1,300 more to do and then..... the roof slates!
Wednesday, 16 May 2012
The Good, the Bad and the bordering on Ugly.

I've done an assortment of bits and bobs the last couple of days some of which is lovely, some OK and some I'd rather hide.
Firstly - the lights. Other than Ray Storey's wonderful lights which sadly I can't afford, I haven't been able to find any (or not many) which look like gas lights. I ended up buying various chandeliers (with some sort of a stem) hanging on chain links which really wouldn't be much use in terms of gas lights. Gas doesn't tend to flow through chains! I am surprised as to how many of them are described as gas lights when clearly they could only be oil lamps or (retro style) electric. A bit of adaptation was needed and planned.
The two main lights (for the shop and salon) were duly dismantled. I was then left with an odd construction on the top of the stem which didn't lend itself to sticking it on to the ceiling. I had read that some plaster roses were still being used in this period to hide the gas connections in the ceiling so that seemed a legitimate idea to hide mine. The roses are plaster and stuck up with wood glue and the lights themselves are super-glued in place.
I found a couple of references in dolls house chatter about not using any glue with lights other than the foam tabs they come with, but no explanation as to why. I can see that some glues won't be happy with the heat when the lights are on but, hopefully, super-glue isn't one of them (????). Actually my lights in the Wentworth which were all attached with their little white pads are endlessly falling off the ceilings. I have been thinking about re-doing those practically from day one. Anyone have any comments/ideas?


and here's the one in the shop.
They both look a bit wonky here but, honestly, they aren't.
The other advantage to removing the chain is that they are also a better height above the floor. All my lights have a six foot (six inch) space beneath them so my little people can actually walk under them.


The kitchen light came like this, other than the foam sticky thing which, by now, I decided could just go. I don't like the looks of them, even when they are working part-time.
I am still waiting for the delivery of one of my upstairs lights and I also have to cut a channel in the roof to take the wiring so they are a long way off being installed.
I guess the lighting makes it to the good category.
 The floors are pretty good too.
Handy tip - if you know at the beginning, before the build, that you will be laying some flooring on any awkward bits - do it then or, at least, make templates for later. Not being a contortionist, I found it a bit of a challenge wiggling about at the back of the house, between floors trying to cover the landings with paper and drawing round the shapes and then sticking the wood down accurately. Double-sided carpet tape is very unforgiving if you get it wrong. This photo is at the template stage.

rub down gently before varnishing and, if you are going for two coats (I did) do the same again between coats. In fact, I even lightly sanded after the final coat. It is a lovely silky finish and not super shiny (like in this picture).

I weight down all the flooring for a day after I have put it in just to be sure it lies flat. As you can see a bit of heavy reading is never wasted. In fact Jonathan Strange and Mr Norrell is backed up behind with (appropriately) The Victorians by A. N. Wilson.

This is the completely nutty item in the 'good' category . I drilled/filed out the overflow so it was more realistic. Yes, I know, totally crackpot as no-one can see it or care, but I like it better.
It also gave me a chance to play with my new little rotary gizmo - such fun.

Now for the bad - the evil shanks on the door knobs were slightly too long. If you tried to stick them into the door on each side they met in the middle and stuck out. You might just be able to see that I had to nip a bit off one of each pair (the one on the right) with some pliers. It was such a teeny bit to demand such an effort. Big jobs always seem worth doing, but spending time snipping bits off door knobs don't.

I've actually managed to fill the bad hole with a couple of minute blobs of paint as the prospect of using wood filler in such a teeny hole on an already painted door filled me with terror.
This leads me to the 'bordering on ugly'.
If you look at the paintwork on the door you can see that I have had a rotten time with the silk emulsion. It is gloopy and refuses to be pushed around easily. I finally realised that it is non-drip. I didn't choose it for that property (and, indeed, hadn't even noticed that's what it says on the tin!) I chose it because it was slightly cream rather than a bright white, silk finish and the cheapest.
 Because I was getting such a poor finish I rubbed it down viciously between coats with wire wool. Every coat I put on went on grey and streaky. Eventually the penny dropped - it was the wire wool!! It leaves a sort of metallic smudge behind - like faint rubbed in pencil marks that kept leaching through the paint which led to more rubbing down and applying more paint. You will gather I'm not thrilled with the doors.
The other issue with them is they are too small all round for the holes which were precut in the Lyddinton but no doors supplied! A careful person would work out how she could fill those gaps successfully. Me, I just partially plugged one side of the door jamb with some off cuts of wood I had and glued them in. This resulted in a load of gaps. Even the gaps would have been improved by remembering to paint inside the cut-out door spaces. Not my best days work. Admittedly this photo is before the trims are put on, they don't look as bad as this.
[Today, when painting the trims, I have discovered the answer to the gloopy paint and I could kick myself. All I had to do was let it down a little with some water. So simple]

I did a poor job laying the lino though. I was so focussed on getting it lined up at the back of the room (Why???) that when it got to the front it was skewed and left a small gap. It isn't possible to lift it and refit as it would just tear it to bits if I tried.

I think the stair landings, floors and walls look good.
Please ignore the flooring in the attic in this photo. It is just loose laid and needs painting before it goes in.
It was commonplace to have very nice narrow walnut or oak floorboards through the good part of a house or shop, which I've done; but the attic room would have just had simple, wide, cheap pine floorboards that would have been painted or stained.
White painted floorboards in bedrooms were very fashionable at this time and Ellen will have those.

I do remember sinks and cooker always being near each other - maybe because of boiling a kettle for the washing up (?). A cooker near the back door wasn't unusual either even though it meant that if the gas was tuned down low it sometimes got blown out by the ensuing draft from the opening or closing of the back door.
I have just done a load of boring painting of trims today. That isn't worth recording either visually or in writing. I'll get back to you when most of them are in place.
Monday, 14 May 2012
See what a week can bring........
Bad post title as it promises much but will deliver little. I've been a bit under par this week so seem to have spent a lot of time prevaricating instead of just getting on with it.
I have made a decision on a fireplace and have ordered a Victorian fireplace for the parlour and a Wilkswood fireplace from Jennifer's of Walsall. They are the Phoenix kits; like the stove I made,so that should be fun - no, really! I am also ordering some Bass wood to make the chimney breasts. The size of the piece has made the dimensions of the chimney breasts change from five inches wide to four inches and from one-and-a-half inches deep to one inch. I have searched and searched for clues as to the usual size of Edwardian chimney breast (and even asked a builder!) but there isn't a definitive answer. Both of the fireplaces are small bedroom-types so they don't need a large flue. I hope it works factually and visually.
 I decided I wanted some tiling behind the sink and cooker area. I found a fantastic site belonging to someone who sells original Edwardian tiles. There were zillions to choose from. Eventually I settled on this one as being typical of the period, not too fancy and in the right colours - 'greenery-yallery'. I copied one tile, reduced it to scale and then repeated the pattern umpteen times.
This photo shows the paper after one coat of varnish. I wanted to be sure the colours wouldn't run before I went any further.
 I pasted the paper to some thin card and gave the tiles a second coat of satin varnish. When they were dry I cut them out into individual tiles and started to lay them out on the pattern I had drawn for the wall space they were to go on.
 Here they are all dry and on the wall. At this point I suddenly saw them as a row of Green Shield stamps and put myself off them completely. I can't seem to shift the vision.
With luck many of you reading this won't even remember Green Shield Stamps.
 I did a pretty crude job of sawing off the wood from behind the sink and draining board area. It had the taps and plug chain fixed to it. These will need to be attached to the wall now via a couple of drilled holes through the tiled area. The tap needed sorting any way as the unit came with two taps and Ellen only has cold water. The plug chain is a bit more problematic. It was fastened through the wood with a bit of wire opened out like a paper fastener at the back. I am sure I can replicate that if I can find a bit of suitable wire. It needs a longer piece than the present one as now has to go through the thickness of the MDF back wall. The sink unit needs painting and varnishing. I am toying with the idea of a bit of the off-cut from the lino being used on the shelf below the sink. In the fifties of my childhood bits of lino came in useful for all sorts of places like this so I am sure our Edwardian cousins would have done the same; especially as lino was pretty newfangled and expensive. Waste not, want not.
 The lino was a bit of a debate. I knew I wanted lino as the kitchen was above ground level and wouldn't have been tiled. It could have remained with floorboards but I thought Ellen would choose easily cleanable lino when she re-did the living quarters. Many Edwardian lino patterns were very fussy and multi-coloured as they were used all over the house. The few 1:12 ones I found wouldn't do for the room I wanted.

I have original source pictures for the ideas behind all my rooms. This is the one showing the feel that I want for the kitchen. (This was an advert from 1911.) With further reading I discovered that the floor in that picture was very probably lino and not tiles. They did do simple checker-board patterns. Yippee - all I had to do was buy an appropriately printed piece of flooring paper and glue it to a grey cardboard backing and hey presto I had lino. The problem now, like then, is that the lino looks like a cheap way of doing tiles!! Let it be noted here that it is a deliberate choice and not a cheap way out. The best of it being a tile pattern is that it is very forgiving when you have to piece it together to make the paper fit the room. There are five bits here and you can't see a single join.
I have made a decision on a fireplace and have ordered a Victorian fireplace for the parlour and a Wilkswood fireplace from Jennifer's of Walsall. They are the Phoenix kits; like the stove I made,so that should be fun - no, really! I am also ordering some Bass wood to make the chimney breasts. The size of the piece has made the dimensions of the chimney breasts change from five inches wide to four inches and from one-and-a-half inches deep to one inch. I have searched and searched for clues as to the usual size of Edwardian chimney breast (and even asked a builder!) but there isn't a definitive answer. Both of the fireplaces are small bedroom-types so they don't need a large flue. I hope it works factually and visually.


With luck many of you reading this won't even remember Green Shield Stamps.

 The lino was a bit of a debate. I knew I wanted lino as the kitchen was above ground level and wouldn't have been tiled. It could have remained with floorboards but I thought Ellen would choose easily cleanable lino when she re-did the living quarters. Many Edwardian lino patterns were very fussy and multi-coloured as they were used all over the house. The few 1:12 ones I found wouldn't do for the room I wanted.
I have original source pictures for the ideas behind all my rooms. This is the one showing the feel that I want for the kitchen. (This was an advert from 1911.) With further reading I discovered that the floor in that picture was very probably lino and not tiles. They did do simple checker-board patterns. Yippee - all I had to do was buy an appropriately printed piece of flooring paper and glue it to a grey cardboard backing and hey presto I had lino. The problem now, like then, is that the lino looks like a cheap way of doing tiles!! Let it be noted here that it is a deliberate choice and not a cheap way out. The best of it being a tile pattern is that it is very forgiving when you have to piece it together to make the paper fit the room. There are five bits here and you can't see a single join.
Monday, 7 May 2012
Bit of an update
I thought you might like to see where I am up to. I haven't done a great deal as the May Bank holiday intervened.


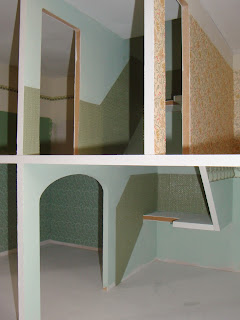

 As I said the stairs are excellent ....
I'm not too thrilled with the mock lincrusta in the kitchen. I used an embossed dolls house wallpaper which would probably have been terrific for ceilings - maybe this is what it is intended for? On the wall the tiny pattern got pretty lost and by the time it had taken two coats of paint it had almost entirely disappeared. I'd also made a bit of a mess painting it; I got paint on the cream wall where I didn't want it. All this, and it only got used in there in the first place because I bought it for the stairs, and then decided that looked too complicated.

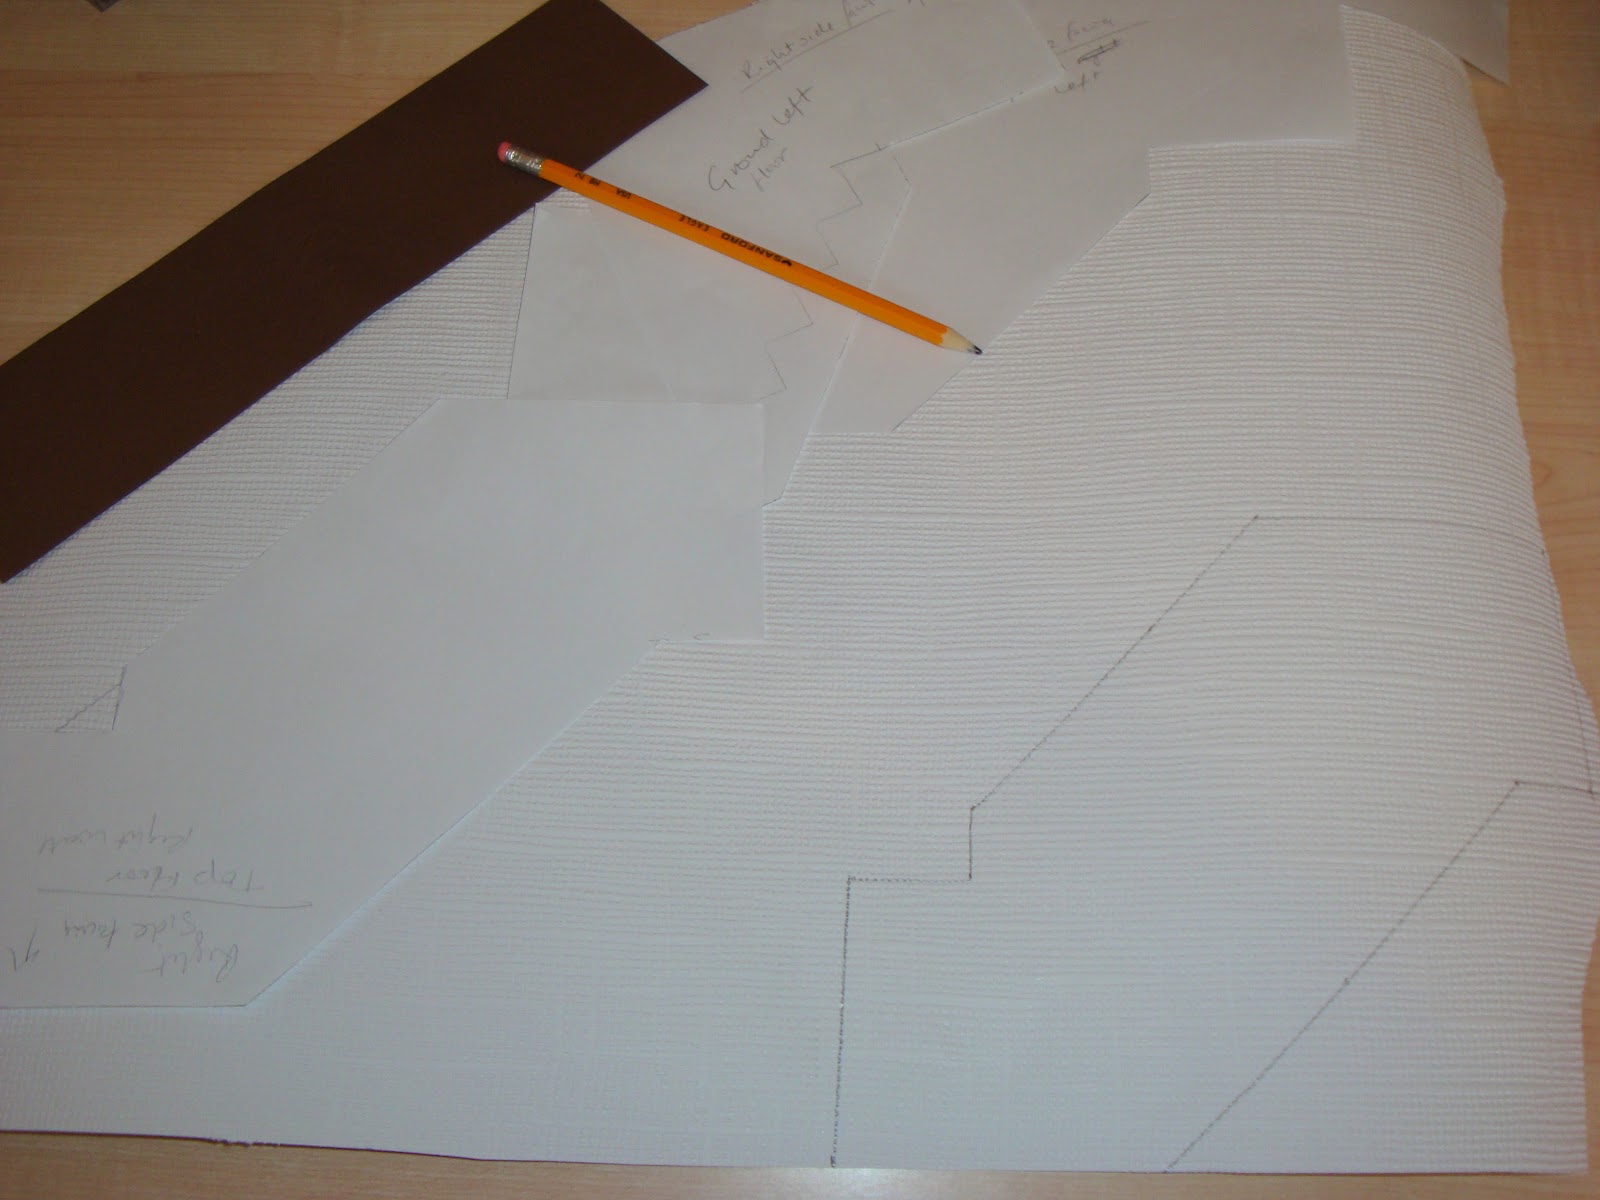
I then managed to get my hands on a large sample of 1:1 Anaglypta that looked the part, so I thought I'd have another go at doing the staircase. After having struggled a long time with a pencil and ruler and a rubber (!) marking up the walls for papering I suddenly realised the obvious way to do it was to make paper templates and cut the wallpaper out from those. This proved even more necessary as I only had just enough for the job. No room for error. It was a good job I did it this way as I went on to discover just how wrong some of my original pencilled-on-the-wall guidelines were. This is a picture of me transferring the template to the real McCoy ready to cut out. The test fits of the templates had gone really well.

I then realised I might as well do the painting before sticking up the paper. This way I wouldn't splodge paint everywhere and if the paper looked rubbish I could just abandon it; no harm done. This is the first coat of paint. Can you even tell it is a different colour to the one in the kitchen? I could kick myself for buying Farrow and Ball sample pots at £4 a time and then choosing two lots of two colours that are so close as to make no difference once they are in situ. The colour of the workroom and the upper wall of the kitchen are pretty close and, as I said, the two 'lincrusta' paints are very similar. Beware of over-egging the pudding and being too picky about some things. That would have saved £8!

Two coats of 'lichen' and one coat of satin varnish later and I am very pleased with the result. This is how lincrusta should look. The pattern is also good for 1911 as cane, bamboo, fresh cottons, linen and other natural fabrics were being used in their 'Arts and Crafts' style homes. Ellen seems to have a foot in a backward glance to Morris and a forward glance to Voysey - all very possible as stores like Liberty promoted both styles (and loads more).

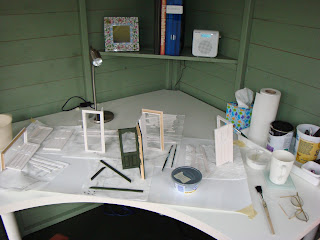
This is a bit of a handy tip photo. If you have small things to paste (or paint) use an old magazine to do it. You can plaster paste (or paint) everywhere, park the item somewhere to dry and just turn over to a new clean page for the next piece. My large drying surface is a one dollar shower curtain across my table. When you are pasting you do need a surface where you can slosh paste over the edges of the paper as they really need to be well covered for a good finish. I use border paste for wallpapering and find it is strong and lump free and does a good job. [Apologies for taking the photo when I was on the slug page! I am not sharing my workshop with the (not so) lovely creatures - they are just photos, honestly]
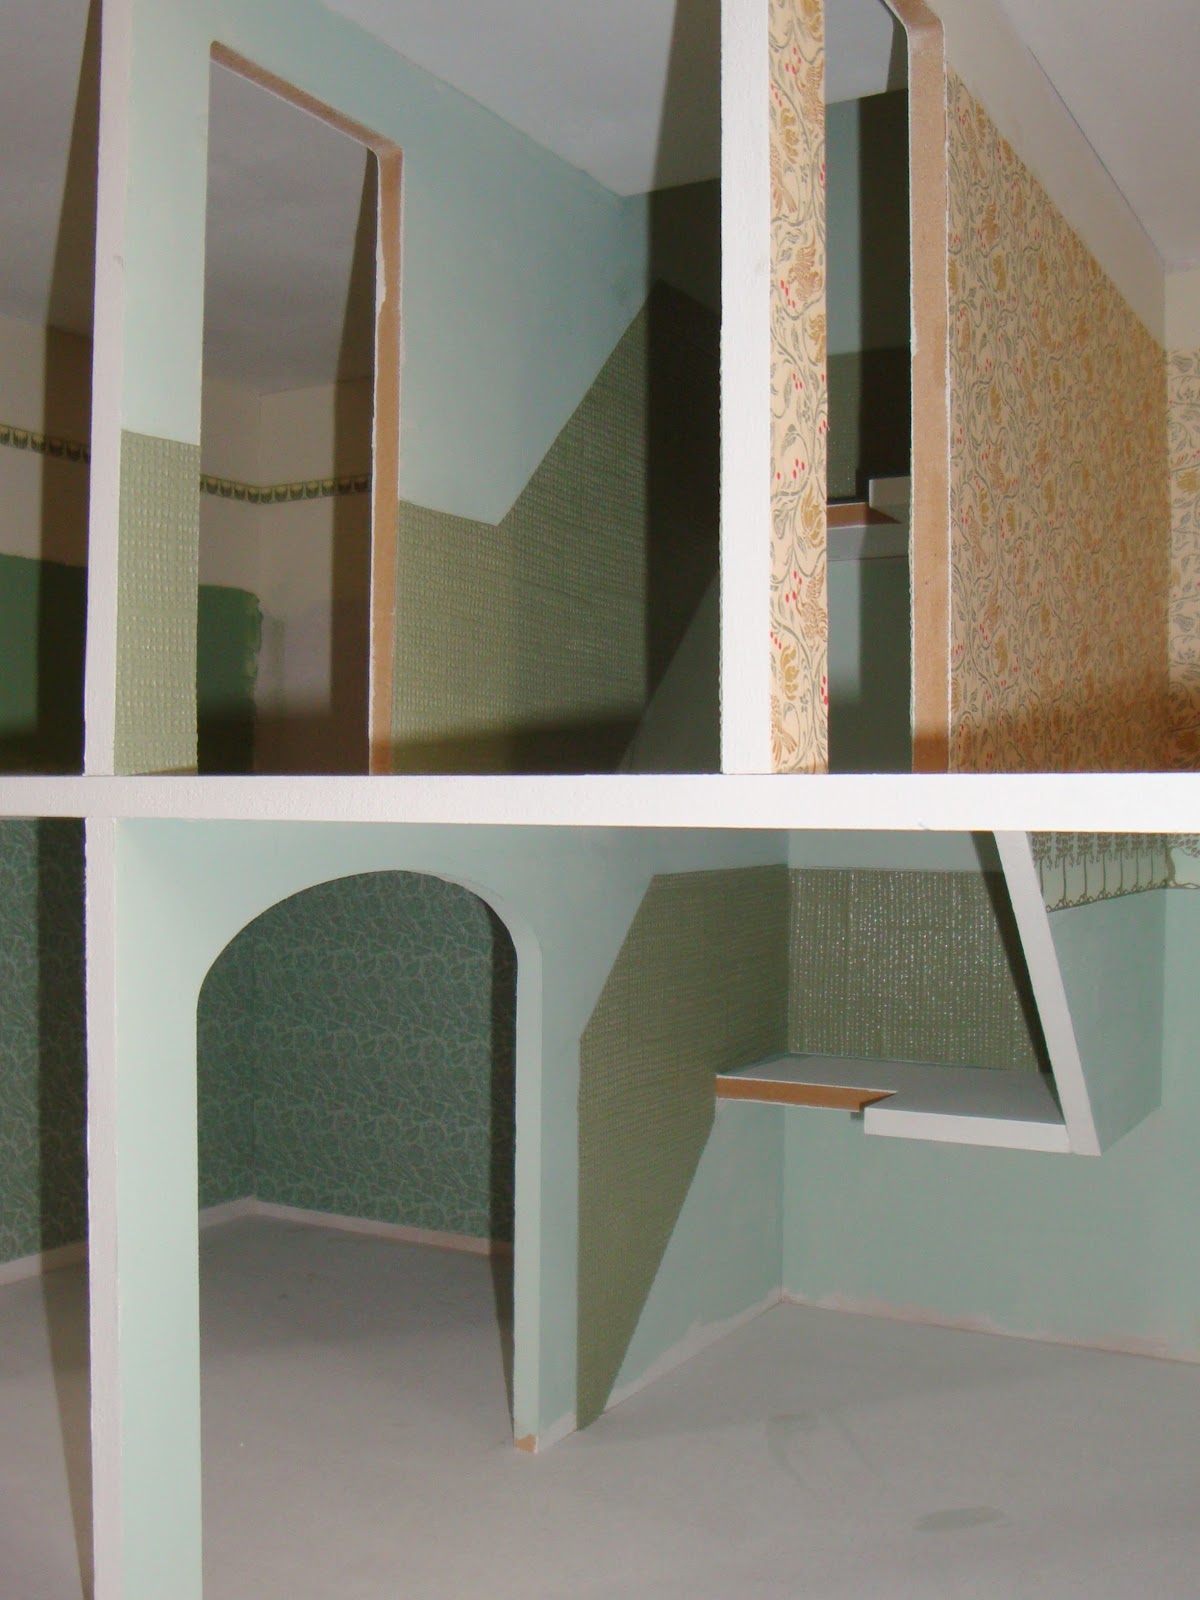
It was the simplest thing in the world to slide the pieces into place. Here it is on the ground and first floor, all ready for the dado rails and maybe a paper border (?) to be added.

These two photos just show you the difference between the stair paper and the kitchen paper.
 As I said the stairs are excellent ....
...... kitchen, not so much

Today I started painting some of the wood.
Last night I cut the pieces of dado rail to go around the stair paper. I identified each piece with a number written in pencil on the back. I simply started at the top of the stairs and numbered every strip in turn as it went down the stairs. So when I come to glue them in place it will be as simple as doing it in numerical order. There are seventeen pieces.
Cutting the various angles was really very troublesome until I again realised that the answer was paper templates. If you don't get the angles exactly right where two pieces meet, one piece of rail will be wider than the other because it has been cut on too much of a slope. Some of the angles proved to be a nightmare if you were relying on accurately measuring and halving them. Who wants to halve 143 degrees for example. It was so much easier to cut strips of paper the width of the rail, lay them along the edge of the wallpaper paper templates and then cut through accurately at the point where they crossed each other. These paper patterns were then transferred pretty easily to the backs of the strips of wood. Even then, after cutting fiddly routed bits of wood (plus the occasional 45 degree slope for corners) they aren't perfect; but I am learning to accept a degree of imperfection to save my sanity (and my purse!). I think they will be fine when they are in place. Hopefully, the stairs themselves will hide a multitude of sins.
I keep finding almost every job I want to do is still being held up by another. Even these rails have been done with some finger crossing because the doors aren't in place and they meet the door jambs at regular intervals. I don't think I will glue them in place until the doors have been glued in. I have had to leave just two of the pieces (!) until the stairs are fitted as there will be a newel post in their vicinity and I am not at all sure how that will all go together.
I have under-coated all the doors but I can't put the doors in until the floors go down. I can't do the floors until the lights and fires and their wiring is in place. I am waiting on two lights and a fireplace (unchosen as yet!). Happily there is a heck of a lot of preparation to keep me busy for a long time. I hope to finish my buying at the York show in June and fitting things will just have to wait until after then.
Looking at all the first coats I am sure they will need rubbing down before applying their second coat.
I didn't like the shop door which came with the kit so way back when the kit arrived I got my resident chippy to re-cut the door hole to fit the door I had already bought for the Honeychurch (remember that?). This one comes with 'glazing'. I couldn't figure out how to disassemble the door for painting. I have seen how to do it somewhere on the web but it looked a bit precarious to me. I just used a Number 2 artist brush to carefully paint next to the 'glass'. So far, so good. The glass came with a couple of marks on it which I can't get off so my excessive care seems a bit late really.
One lesson to be learned from all this is not to slavishly follow anyone else's order of build. I had already clipped and read and reread three (fairly!) comprehensive ones in my pre-build research and not one of them bears any resemblance to what is actually happening with my project.
Two of them are from people who do this sort of thing all the time for commissions. I can see how they are able to have a set construction routine as they will, no doubt, have any and all of the bits and bobs they will need right at the outset. Most of the rest of us are trying to find stuff as we go along and are sometimes held up by not being able to find it (!) or (a temporary) lack of funds.
The third of my detailed instructions is in a blog similar to this and, like me, she has gone about it the way which suited her time and money the best, so that doesn't particularly match my approach either.
That said, it was comforting to read other order-of-builds as it was less like stepping off into the unknown. They also gave me plenty of prods and nudges to help me understand the best approach to my project. In that vein I hope my minutely detailed record is useful to someone else's build, some time, in some way!
That said, it was comforting to read other order-of-builds as it was less like stepping off into the unknown. They also gave me plenty of prods and nudges to help me understand the best approach to my project. In that vein I hope my minutely detailed record is useful to someone else's build, some time, in some way!
Tuesday, 1 May 2012
Selling the Honeychurch table
 A lovely display table to set off your dolls house properly.
25 inches wide, 25 inches deep and 24 inches high.
64 cms wide, 64 cms deep and 61 cms high
weighs 21 kilos
you cannot remove the legs for transporting.
White
With useful drawer space. Not always seen on these tables.
Please note this is a full size piece of furniture for your doll's house to sit on. It is NOT a 1:12 miniature.
This item has to be picked up. I am happy to accept cash on pick up.
If you are considering using a courier to pick up, check the cost of the pick up before bidding as this can be very expensive.
The Honeychurch table is on EBay if anyone reading this is interested. This is the advert.
Subscribe to:
Comments (Atom)